


AHHHH! I haven’t done a sewing post in ages! Well, if you are in the neighborhood looking for a great bib pattern and tutorial, I hope I can help you out. I love sewing, babies, and you obviously, since I’m writing this and sending it off into the void. So thanks for being here! Let’s get sewing shall we?
You’ll need:
*Fabric for front side of bib (12″x 15″)-Cotton
**Fabric for back side of bib (12″x 15″)-Cotton
Old hand towel (same dimensions), if you’d like a more absorbent bib.
Velcro (about 2 1/2″)
Scissors, thread, a sewing machine, and a needle for hand sewing
*I am making a patchwork-style bib, so I’ll be piecing together scrap fabric. So if you’re doing this as well, this is the dimension you’ll need once your scraps are sewn together.
**Note: This is a reversible bib. If this doesn’t interest you, you may want to skip the fabric for the back side of the bib and just have the old hand towel as the backing. When you get to step 9, simply sew your front cotton piece to your towel right sides together, leaving a hole at the bottom and continue normally.


Print both pages of the pattern above and tape together.
Instructions (there are plenty of photos beneath for reference):
- Wash and dry all your fabric to prep. Lay out your options and iron.
- Cut out your towel on the fold.
- Now you have a reference to lay your scraps on if you’re doing a patchwork style one like me. So go ahead and cut your scraps out and sew. Make sure that you have an overlap of fabric around the edges of at least 1/4″.
- Iron your seams flat.
- Fold your new piece of fabric in half, right sides together.
- Here’s a picture of my pattern pinned on the fold. Cut!
- Alright, repeat with the back side of the bib if you choose to do so. Since my front was busy looking, I decided to go for a simple yellow and continue the pink stripe from the front.
- Iron all your cotton pieces with the seams laying flat. You should now have all 3 bib-looking things. Sweet!
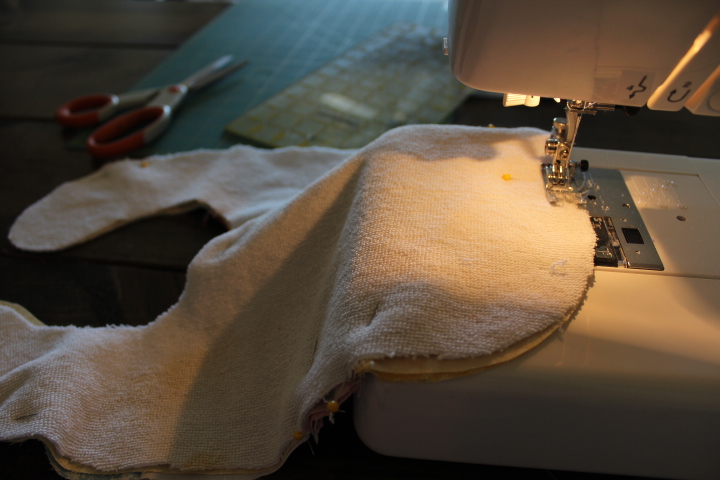
- Layer cottons right side together, then lay the towel on top. Pin.
- Sew with 1/4″ seam allowance leaving a 3″ gap to pull right side out later. I left my hole on the bottom.
- Layer the seams if your bib is bulky. Clip the neckline and notch the straps. I know I don’t have the best example of the clips or the layering. Sorry! To layer, cut a single layer of fabric in the seam allowance a little shorter than the one beneath it. This will decrease bulk. To clip, make small slits without cutting through the stitches. This will help the fabric fan out more easily. The notches on the wings are triangles and it will help ease all that bumpy fabric into a pretty finish.
- Pull the bib right side out. My hole was a little small, but it worked out okay. Press.
- Hand sew the hole up. I used the invisible stitch. Here is a video if you want help.
- Sew your velcro on with a small stitch length to help with wear and tear.
Thank you for coming by! Good luck on your bib! Please feel free to ask questions in the comments or you can email me.
1.
2.

3.
4.

5. Matching up seams to the backside
6.

7.
8.

9. Layer cottons right side together, then lay the towel on top.


10.
11.


12.
13.

14.

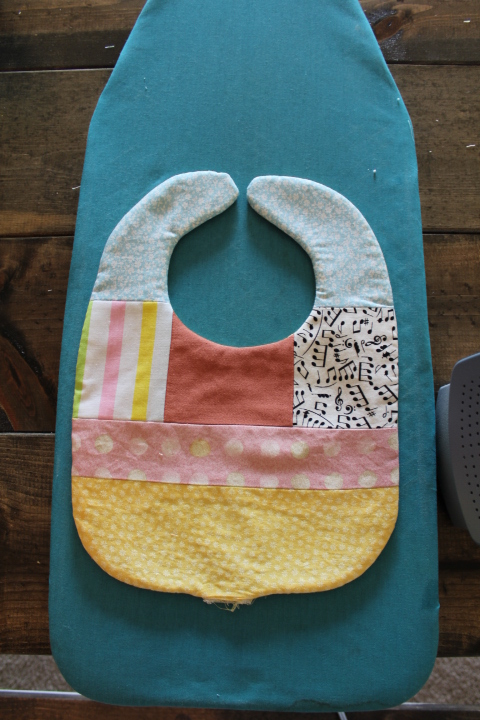
Completed bib!

